
Two coolers of identical size sit side by side. One costs the equivalent of a nice dinner; the other costs as much as a smartphone. To an untrained eye they look like the same product: a plastic box, a lid, two handles. Yet one will crack at the hinge within two summers and struggle to keep ice overnight, while the other will still be sealing tight after a decade of truck beds, boat decks, and campsite abuse, holding ice through a week-long trip.
The difference is not branding, or at least not mostly. It is construction: how the shell was made, what fills the walls, what the gasket and hinges and latches are made of, and how those parts are joined. Construction is the most learnable subject in the entire cooler niche, because unlike electronics, everything is visible or testable in a showroom in about five minutes, once you know what to look at.
This guide covers the three fundamental construction methods, the materials inside and outside the walls, the hardware that usually fails first, and a practical inspection routine that turns any cooler purchase from a gamble into an informed decision.
The Three Ways to Build a Cooler
Every hard or soft cooler on the market is built one of three ways, and the method sets the ceiling on everything else.
Rotomolded: One Seamless Piece
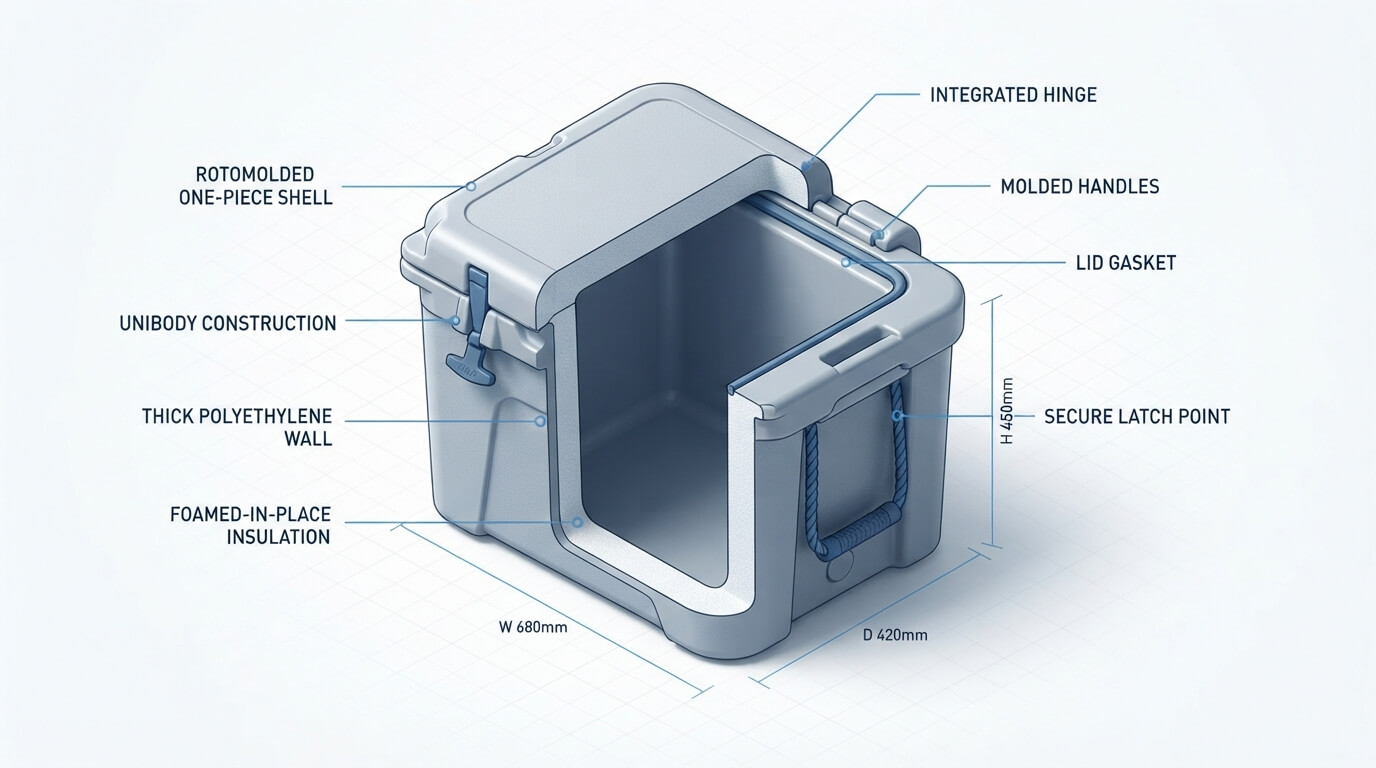
Rotational molding, “rotomolding,” is the construction behind virtually every premium hard cooler. Powdered polyethylene is loaded into a large metal mold, which is heated and slowly rotated on multiple axes simultaneously. The melting plastic coats every interior surface of the mold evenly, and when it cools, the result is a single, seamless, hollow shell with no joints, no glued panels, and remarkably uniform wall thickness. The hollow cavity between inner and outer walls is then injected with pressurized polyurethane foam.
The performance consequences all flow from that seamlessness. No seams means no weak lines where impacts concentrate and no joints for heat or water to sneak through. Uniform thick walls mean uniform thick insulation, typically five to eight centimeters of foam, including the lid. The one-piece structure is why rotomolded coolers survive drops, bear the weight of a person standing on them, and in many cases carry certification as bear-resistant containers from the Interagency Grizzly Bear Committee’s testing program, in which coolers must survive a serious impact protocol (and, in live testing, actual captive grizzlies).
The trade-offs are equally structural: rotomolding is slow and energy-intensive, so the coolers are expensive; all that plastic and foam is heavy, with large models weighing 15 kilograms or more empty; and thick walls eat interior volume, so a “50-liter” rotomolded cooler is much larger outside than an injection-molded 50-liter. Our head-to-head Pelican Elite vs. Orca performance test is a study in how two well-executed rotomolded designs still differ in the details.
Injection-Molded: Panels Joined Together
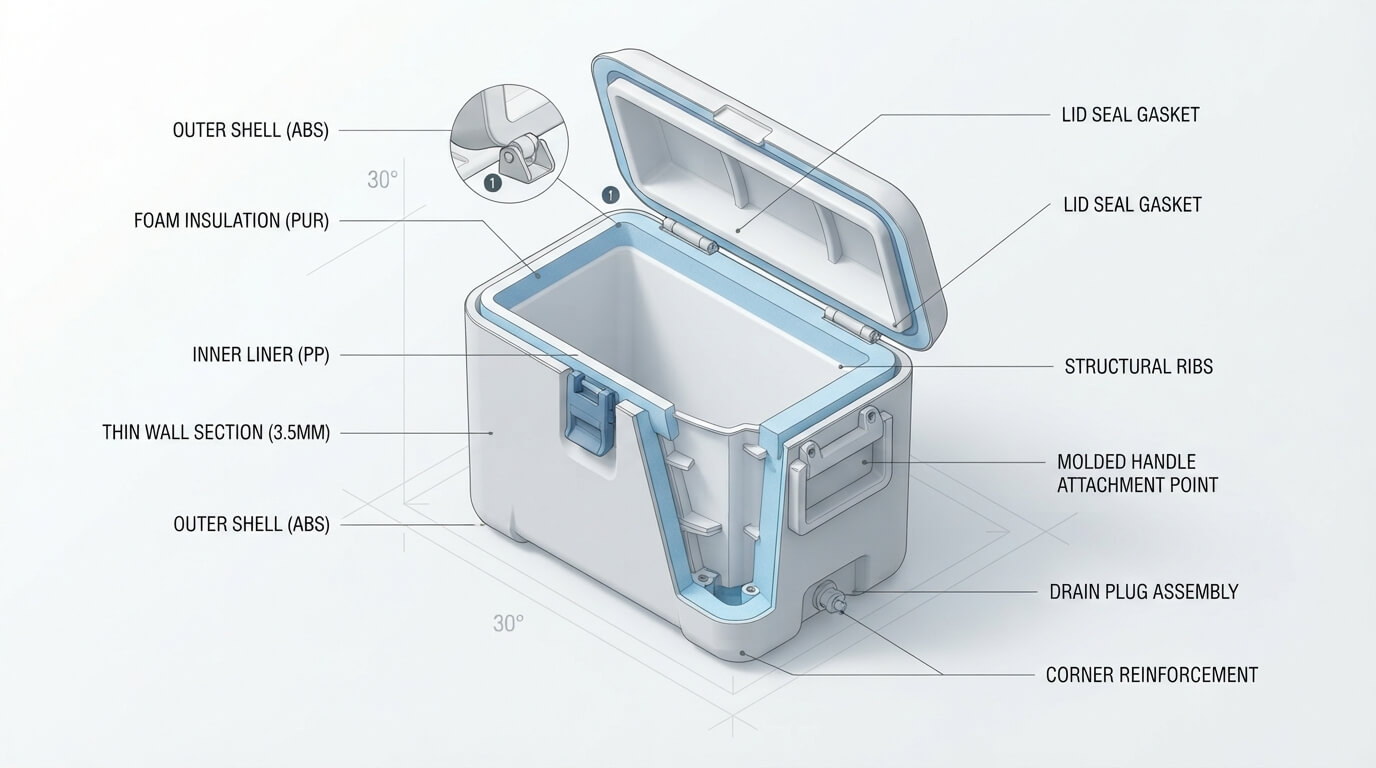
The classic family cooler, and the vast middle of the market, is injection-molded: molten plastic shot into molds at high pressure, producing separate inner and outer shells that are then assembled around a foam layer (or, in the cheapest units, around plain air). Injection molding is fast and cheap, allows thinner and lighter parts, and produces crisp details like molded-in cup holders, rulers, and hinge features.
The structural cost is the assembly itself. Joints between panels are stress concentrators and thermal weak points. Foam in a mid-range injection-molded cooler is typically two to four centimeters and frequently thinner or absent in the lid, which is exactly where many budget coolers give up their ice. None of this makes injection-molded coolers bad; a good one is the rational choice for driveway barbecues, beach days, and any duty cycle measured in weekends rather than expeditions. It makes them different, and the price difference honest.
A worthwhile middle tier has emerged: injection-molded coolers with pressure-injected foam and upgraded gaskets, sometimes marketed as “roto-style” performance at lower weight and cost. They genuinely narrow the gap for stationary use; the remaining difference shows up in impact durability and in the lid.
Soft-Sided: Fabric, Foam, and Welds
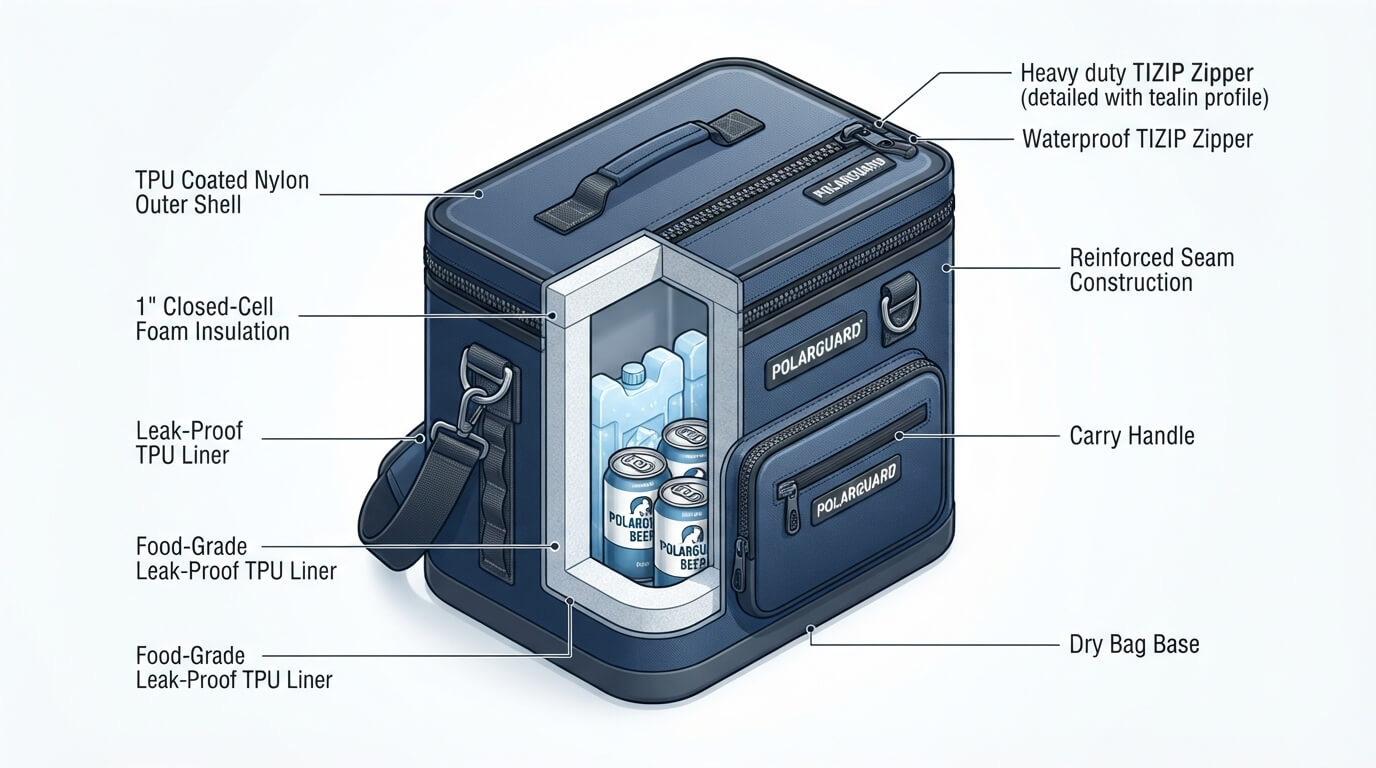
Soft coolers replace rigid shells with flexible construction: an outer fabric (commonly 500 to 840-denier nylon or TPU-coated polyester), a closed-cell foam insulation layer of one to three centimeters, and an interior waterproof liner. Quality in this category is dominated by two things buyers rarely check.
First, the liner and its seams. Premium soft coolers use radio-frequency-welded seams, fusing the liner into a single waterproof unit, while budget bags use sewn seams with taped covering that eventually leaks. Second, the closure. Waterproof zippers (the stiff, rubberized kind used on dry suits) seal nearly airtight but need occasional lubrication and cost real money; standard zippers under a flap are convenient and leaky. A soft cooler’s ice retention claim is meaningless without knowing which closure it uses.
Soft-sided construction wins on weight, packability, and shoulder-carry comfort, and concedes multi-day retention and crush protection. For the jobsite-and-daytrip duty where this category lives, our comparison of the Cordova soft cooler versus the DeWalt cooler shows how construction choices play out in real use.
The Plastics: What the Shells Are Actually Made Of
Nearly every hard cooler shell is polyethylene, but polyethylene comes in grades that behave very differently.
High-density polyethylene (HDPE) is the workhorse: stiff, chemical-resistant, UV-stabilizable, and tough across a wide temperature range. Rotomolded shells are typically HDPE or similar high-grade PE, often with UV inhibitors mixed in, which is why premium coolers fade slowly and stay ductile after years outdoors.
Low-density and cheaper blended polyethylenes appear in budget shells. They flex more, scratch more easily, and, critically, become brittle in cold and degrade faster under UV exposure. The cracked white lid on an old cheap cooler is UV-embrittled low-grade PE telling its story.
Polypropylene (PP) shows up in lids, trays, and accessories: lighter and stiffer than PE, but more brittle at low temperatures.
Two material topics deserve their own attention. Food-contact safety: the interior liner touches your food and meltwater for days, and “plastic” is not automatically “food-safe plastic.” The distinction between FDA food-contact-compliant resins and generic plastic, and what the certifications actually guarantee, is important enough that we gave it a full article: Cooler Certifications: FDA Food-Grade vs. Standard Plastic Safety Standards. Odor and stain behavior: polyethylene is slightly porous at the microscopic level, and lower-grade, rougher-surfaced PE absorbs fish, bait, and food odors far more readily than the dense, smooth liners in premium builds, a difference we explore in our guide to cooler odor retention and plastic types.
The Foam: Where the Performance Actually Lives
Insulation does the thermal work, and cooler foams differ on three axes: type, thickness, and how they were installed.
Polyurethane (PU) foam, pressure-injected, is the premium standard. Injected as expanding liquid into the sealed wall cavity, it fills every corner, bonds to both shells (adding rigidity), and cures into a closed-cell structure whose trapped gas conducts heat very poorly. Per the U.S. Department of Energy’s material references, closed-cell polyurethane offers among the highest R-values per inch of common insulations (roughly R-6 to R-7 per inch), which is why an 8-centimeter PU wall performs so dramatically well; the DOE’s overview of insulation materials is a good primer on why.
Expanded polystyrene (EPS), the white bead foam of disposable coolers, and cut foam board inserted between shells serve the budget tier: cheaper, lower R-value per inch (around R-4), and, when inserted as pre-cut panels rather than injected, prone to gaps at corners that act as thermal bridges.
Closed-cell PE/EVA sheet foam is the soft-cooler standard: flexible, water-resistant, modest R-value, chosen for bendability rather than maximum insulation.
Two field notes. Thickness beats type: 6 centimeters of ordinary foam outperforms 2 centimeters of excellent foam, so always translate marketing (“high-density insulation!”) into measured wall and lid thickness. And wet foam is dead foam: if water infiltrates through a cracked shell or failed seam, waterlogged foam conducts heat many times faster than dry foam, permanently. A used premium cooler that feels oddly heavy may be carrying trapped water in its walls, one of the most valuable checks when buying second-hand.
Hardware: The Parts That Actually Fail
Ask any warranty department: coolers rarely die by shell. They die by hinge, latch, gasket, and handle, which makes hardware the highest-yield inspection area for buyers.
Gaskets. The freezer-style rubber or silicone gasket around a premium lid is arguably the single most cost-effective component in the entire cooler, shutting down the convective air exchange that drains budget coolers. Check that it is a genuine compressible gasket seated in a channel, not a decorative rubber strip, and check whether the manufacturer sells replacements, because gaskets are consumables on a decade timescale.
Hinges. The classic budget-cooler death is a snapped plastic hinge. Premium designs use full-length integrated hinge systems, aluminum or stainless pins, or molded interlocking hinges that are part of the rotomolded shell itself and effectively unbreakable. Open any showroom cooler fully and past vertical; if the hinge is the stop, imagine a wind gust doing the same.
Latches. Rubber T-latches (thick molded rubber loops that stretch over a molded catch) dominate the premium tier because they have no rigid parts to snap and they pull the lid down onto the gasket with real compression. Plastic snap latches are lighter and easier one-handed but are the first casualty of cold weather brittleness and repeated cycles.
Handles and load paths. Rope handles with molded grips spread load and never snap; rigid swing-up handles are more convenient and more mortal. On big coolers, how weight is carried matters as much as what carries it; the ergonomics of hauling 40 kilograms of ice and food are their own topic, which we cover in our analysis of centre versus side handles and lifting strain.
Drain plugs. Look for metal-reinforced threads or generously deep plastic threads, an O-ring or gasket on the plug, and ideally tethering. Cross-threaded budget drain plugs are a quiet, chronic source of both leaks and heat exchange.
Construction Details That Separate Good From Great
Beyond the big three of shell, foam, and hardware, a handful of details reliably mark out serious design.
Lid engineering. The lid takes sun from above, warm air rising from below, and all the mechanical abuse of being sat on. Great coolers put full-thickness foam in the lid, add a gasket channel, and mold in a lip-over-rim geometry so the closed lid sheds impacts to the shell. Press the center of any lid: flex and hollow sound mean savings were taken exactly where heat attacks hardest.
Feet. Molded non-slip feet lift the base off hot ground, cutting conductive heat gain and protecting the shell from abrasion. Their absence is a small tell about the design budget.
Interior geometry. Slightly tapered walls and radiused corners are not just for easy cleaning; sharp inner corners are where liners crack. A basket ledge and a molded drain channel sloping to the plug indicate a designer who has actually used a cooler.
Fastener discipline. Stainless screws and pins survive meltwater and coastal air; zinc-plated hardware weeps rust streaks down the shell within a season or two. One glance at hinge screws on a used cooler tells you its life story.
The same construction-first lens applies to insulated drinkware, where double-wall vacuum construction (an actual vacuum gap between stainless walls, the highest-performing “insulation” there is) explains why a good bottle keeps ice for 24 hours; our Hydro Flask vs. YETI Rambler comparison puts two flagship implementations of that construction head to head.
Caring for Each Construction Type: Making Materials Last
Knowing what a cooler is made of also tells you exactly how to make it last, because each material has specific failure modes and specific protections.
Polyethylene shells and UV. Sunlight is the slow killer of all plastic coolers. UV-stabilized premium shells resist it for many years; budget shells chalk, fade, and embrittle within a few seasons of outdoor storage. The care rule is universal and free: store every cooler out of direct sun, and if outdoor storage is unavoidable, cover it. A cooler that lives in a garage instead of on a porch can easily double its service life.
Foam and water. The waterlogged-foam failure described earlier is preventable. Repair shell cracks promptly (polyethylene can be plastic-welded by anyone with modest DIY skills and a heat source, since glues barely bond to PE), keep drain plugs seated during washing, and never pressure-wash seams on an injection-molded cooler, where high-pressure water can drive past joints into the wall cavity.
Gaskets and rubber hardware. Rubber’s enemies are UV, ozone, and dry heat. Wipe gaskets and T-latches clean of grit (which abrades them under compression), and treat them once or twice a season with a silicone-based rubber protectant, the same habit that keeps car door seals alive. Store the cooler with the lid slightly ajar, which rests the gasket uncompressed and, as a bonus, prevents the trapped-moisture mildew that causes most cooler odor complaints.
Liners, stains, and smells. Clean promptly after trips involving fish, bait, or marinades; the longer organic residue sits, the deeper it migrates into the polyethylene’s microscopic pores. Baking soda solutions handle routine cleaning, diluted bleach handles sanitizing, and a paste of baking soda left overnight pulls out most established odors. Sun-drying the open cooler for a few hours after cleaning is the one good use of UV, sanitizing the liner faster than it ages the shell.
Soft cooler fabrics and zippers. Waterproof zippers must be kept clean and lubricated with the manufacturer’s wax or a zipper-specific lubricant, or they stiffen and eventually tear the surrounding fabric under forcing. Rinse salt exposure the same day; dried salt crystals abrade fabric coatings and corrode sliders. Store soft coolers unzipped, dry, and uncompressed, since long-term compression permanently thins closed-cell foam and its insulating value with it.
Hardware maintenance. A drop of oil on metal hinge pins annually, snugging any screws that seasonal expansion loosens, and immediate replacement of a torn latch (spares are cheap; a lid flapping in a truck bed is not) round out a maintenance routine that totals perhaps twenty minutes a year and doubles the effective lifespan of the parts most likely to fail.
Frequently Asked Questions
Is rotomolded always better than injection-molded? Better at being a rotomolded cooler, yes: retention, toughness, longevity. Better for every buyer, no. Rotomolded coolers are heavy, bulky for their capacity, and priced accordingly. An honest match to duty cycle beats a blanket answer; a weekend picnicker who buys rotomolded is paying for expedition capability that will never be used, while an overlander who buys budget injection-molded will be shopping again next season.
Why are premium coolers so heavy even when empty? The weight is the product: thick polyethylene walls and five-plus centimeters of dense polyurethane foam on all six sides. There is no premium cooler that is simultaneously light, cheap, and high-retention, because the physics of insulation runs through mass and thickness. The lightweight exception on the horizon, vacuum-insulated panels, trades the weight problem for fragility and price.
Can a cracked cooler be repaired? Shell cracks in polyethylene, yes, by plastic welding with PE filler rod; adhesives generally fail on PE because so little bonds to it. The urgent part is doing it before water enters the foam. Cracked liners on injection-molded coolers are harder, since the crack often rides over hidden foam already wet. Hardware, by contrast, is the easy repair category on any brand that sells spares, which is a genuine buying criterion.
Do wheels compromise construction? Well-executed wheel systems (axles molded through the rotomolded shell, oversized wheels) sacrifice little. Cheap bolt-on wheels create shell penetrations, which are both structural weak points and potential water paths into the wall. On any wheeled cooler, inspect where the axle meets the body with the same suspicion you would give any other hole in an insulated wall.
Is the plastic in budget coolers safe for food? Usually the liner is a food-contact-compliant resin even on inexpensive models from established brands, but “usually” is not “always,” and unbranded imports are where the uncertainty concentrates. What the FDA food-contact framework actually certifies, and how to verify a specific cooler, is exactly the subject of our certifications guide. As universal practice, keep food bagged or containerized rather than loose against any liner, which also solves the meltwater and odor problems in one move.
What construction should I look for in hot climates specifically? Everything in this article, weighted toward the lid (full-thickness foam, genuine gasket), light exterior colors (radiant gain is brutal on dark shells in tropical sun), UV-stabilized resin, and molded feet to break contact with scorching ground. In consistently hot, humid conditions, gasket quality moves from nice-to-have to decisive, because the temperature gradient driving air exchange never takes a night off.
Do colors and finishes affect anything besides looks? Two real effects. Light colors reflect more solar radiation, keeping shell temperatures lower in sun, a measurable retention advantage in exposed use. And texture matters for the interior: a glossy, dense liner surface releases stains and odors that a rougher matte surface holds onto. Exterior aesthetics, from pastels to camo, are otherwise free of performance consequences, and how style trends interact with function in this category is a conversation of its own, one we take up in our look at pastel aesthetic coolers versus rugged camo gear.
The Five-Minute Showroom Inspection
Condensed into a routine you can run on any cooler, anywhere:
- Lift it empty. Honest foam has honest weight for its class. Suspiciously light means thin or missing insulation; oddly heavy on a used cooler may mean waterlogged foam.
- Press the lid center and the wall midpoints. Solid, dead feel is foam; drum-like flex is air.
- Work every latch, hinge, and the plug ten times. Anything that binds or flexes alarmingly in minute one will fail by season two.
- Check the gasket line. Close the lid on a strip of paper at four points around the rim; real compression grips it everywhere.
- Read the surfaces. Interior liner smooth and dense (odor and stain resistance), stainless fasteners, molded feet, drain channel sloped to the plug.
Five minutes, no tools, and you will know more about that cooler than its product page will ever tell you. Construction is destiny in this category: the molding method sets the ceiling, the foam sets the performance, and the hardware sets the lifespan. Learn to read all three, and every price tag in the aisle suddenly makes sense, including the ones that don’t deserve to be paid.
Matching Construction to Duty: An Honest Buying Framework
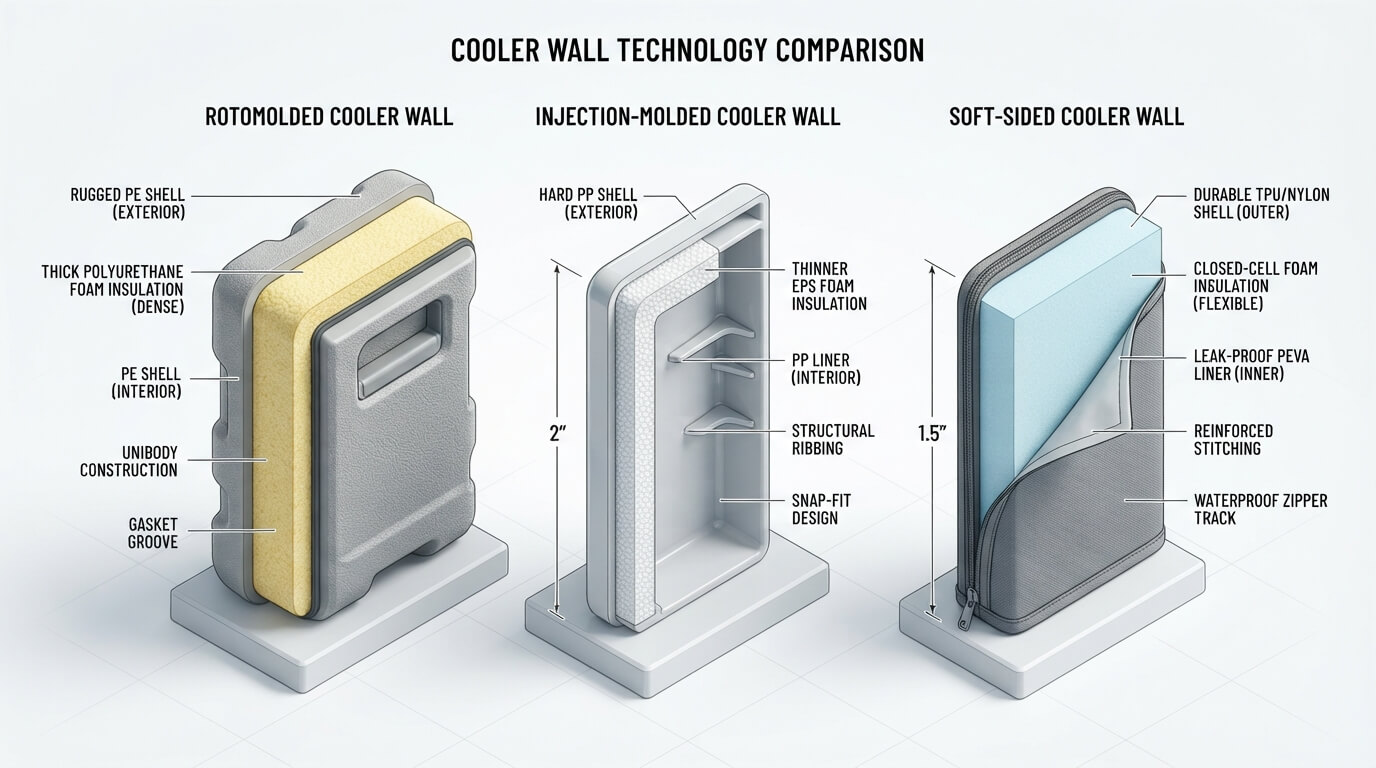
Construction quality is not a moral hierarchy; it is a matching problem between build and duty cycle.
Weekend driveway and beach duty (ice needed for 24 to 48 hours, gentle handling): a well-made injection-molded cooler with real foam in the lid is the rational buy, and money saved over rotomolded is money genuinely saved.
Multi-day camping, fishing, hunting, overlanding (3+ days of ice, rough transport, hot environments): rotomolded construction earns its price here, in retention, in surviving abuse, and often in bear-resistance certification where regulations require it.
Daily carry, jobsites, hikes, commutes: soft-sided construction wins outright, and your money should go to welded liners and real zippers rather than size.
Long ownership horizon: prioritize replaceable consumables (gaskets, latches, plugs available as spare parts) and warranty substance. A lifetime warranty on a cooler whose gasket is not replaceable is worth less than a 5-year warranty with a full parts catalog, a distinction we dissect in The Truth About Cooler Warranties.